Gazelle Webservice Tester
Introduction
The purpose of Gazelle Webservice Tester is to provide a user-friendly graphical interface for the execution of the test plans based on SoapUI projects. Such a tool provides the following benefits:
- Users are not required to install SoapUI in their local environment to run the test
- Only administrators of the tool are allowed to upload and update SoapUI projects so we know exactly what is executed by the SUT operator
- Results are all stored in a consistent manner and can be retrieved easily
In addition, the tool is linked to Gazelle Test Management which allows the user to retrieve the systems’ parameters from a specific test instance (instead of manually entering all the endpoints).
Log in
In most case, you will have to be logged in order to perform actions in Gazelle Webservice Tester. To do so, click on the CAS Login button (top right), and input your testing session credentials.
Execute a project
You shall be logged in to perform this operation.
Execute a test instance
Go to Run. Select the EPR project, check “Execute a test instance (eHealthSuisse)”, fill the test instance ID (Only the numbers) and then click on Get parameters.
The tool will retrieve the parameters needed to execute the test. You need to check if the endpoints are correct and modify them if necessary. Once everything is ok, click on Run.
The execution can take some times. Once finished, you will be redirected to the results.
Execute a test component
Go to Run. Select a SoapUI project, browse the tree and select the test component you want to execute. Set the values (if any) and click on Run.
The execution can take some times. Once finished, you will be redirected to the results.
Rerun an execution
You can rerun an execution by clicking on the Execute again button on the Execution result page or via the Execution list page by clicking on the Re-run execution logo at the far right of the table.
Administrator manual
Upload a SoapUI Project
Go To Project List then click on Add a SoapUI project. Select your project and change the label if necessary. You can select the properties that the users will need to set before executing a project by clicking on a test component and checking the properties :
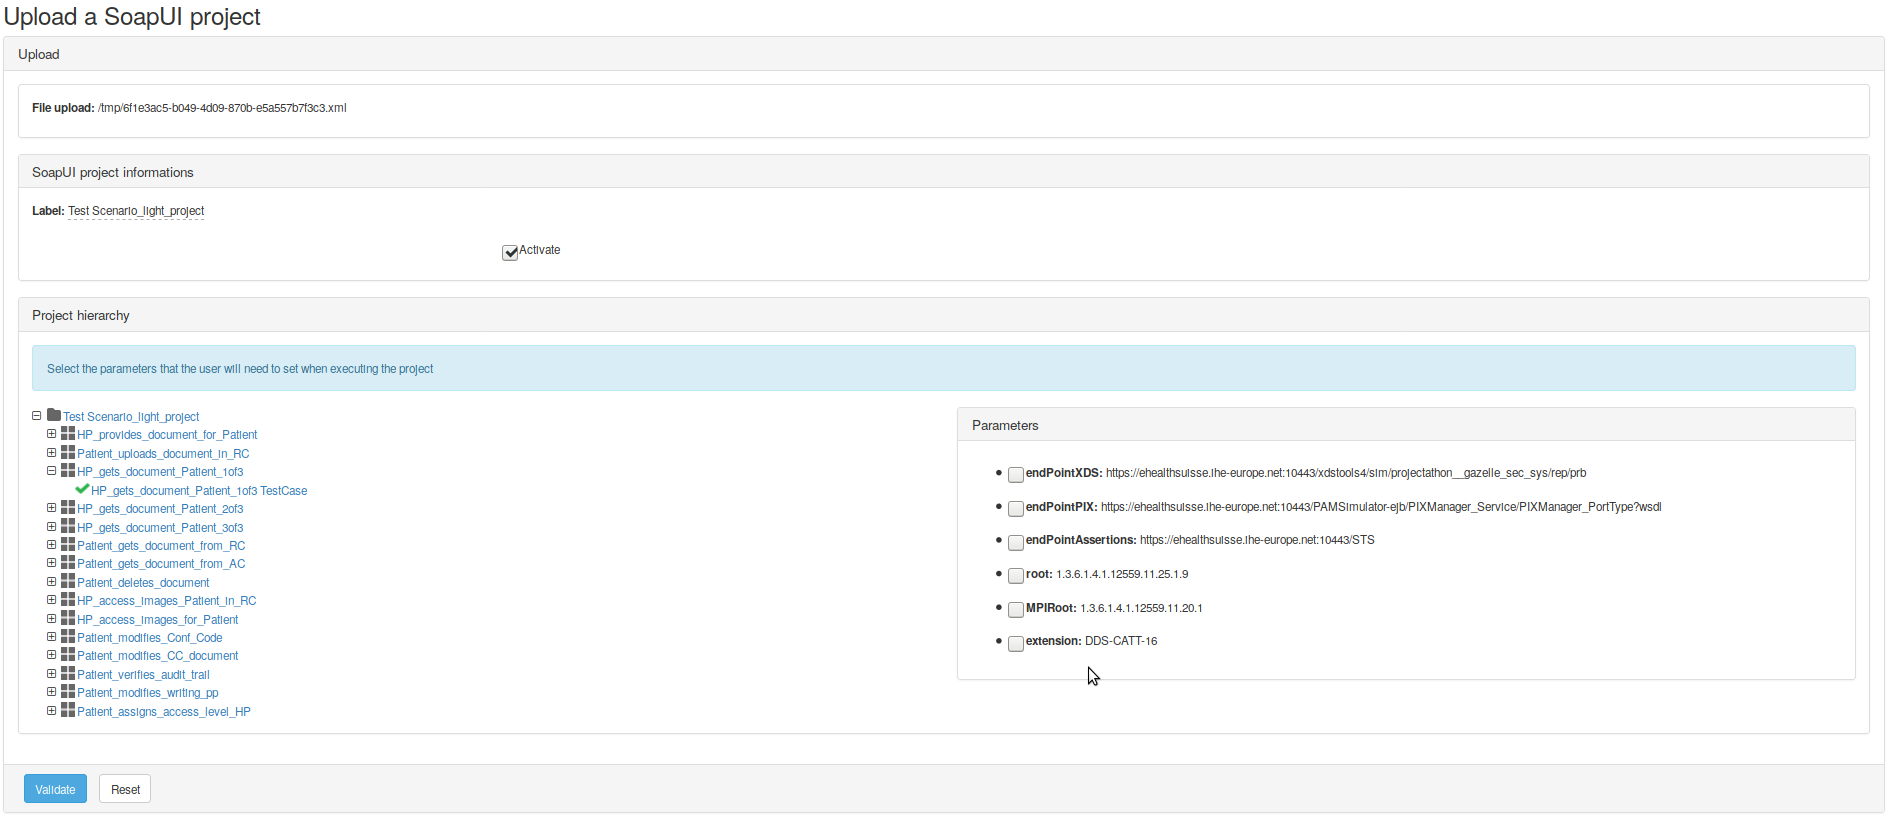
Click on Validate to upload the project into the tool.
Perform a Cross Validation
In addition to validation, it is possible to perform cross validation through EVSClient cross validation embedded module.
Some important instructions must be followed, prior to uploading a project in Gazelle Webservice Tester.
Please follow the instructions below.
First step : definition in SoapUI Project
A cross validator is identified by its oid, defined in the SoapUI project custom properties and its inputs, project’s test steps all accross the project.
Define a cross validator OID
Each SoapUI project has an optionally defined set of custom properties.
To perform cross validation on Gazelle Webservice Tester, at least one cross validator OID needs to be defined at this level.
Note that as much OIDs as needed can be defined, as long as each oid corresponds to a cross validator.
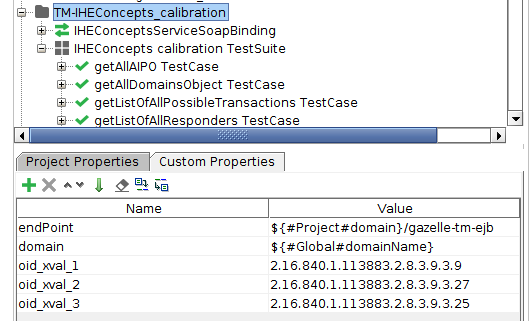
To access this table, click on the project and select the initially unselected “Custom Properties” tab in the bottom left hand corner of the page.
In the name column, insert a property name, using the following pattern : oid_xval_X with X the id you want to use.
**WARNING** : Any other property name will not be recognized for cross validation.
In the value column, add an oid to each name. Cross validator OIDs are displayed in EVSClient or Gazelle X Validator Rule Editor tool.
Example : to call a cross validator using EVSClient embedded module, the oid must be built using EVSClient’s root OID adjoined with the cross validator id.
Identify cross validator inputs
Identify the test steps in your project, which correspond to the inputs of the cross validator you want to call.
To do so, add a property test step, in each of the identified test step’s test case, by right clicking on the test case.

Name it like the following pattern : xval_X with X the id used in your project custom properties.
Inside the property test step, each defined property refers to an input :
-
The name of the property must exactly correspond to the input’s keyword.
-
The value of the property must exactly correspond to the test step name you want to pair the input with/the content of the test step needed (request or response).
Second step : perform cross validation in Gazelle Webservice Tester
Upload and Run your SoapUI Project in Gazelle Webservice Tester.
If the cross validator properties are well defined in your SoapUI project, the page Execution result should contain the field “Cross validation” with all the OIDs defined. If this field is not visible, it means that no OID(s) have/has been detected in your SoapUI project.
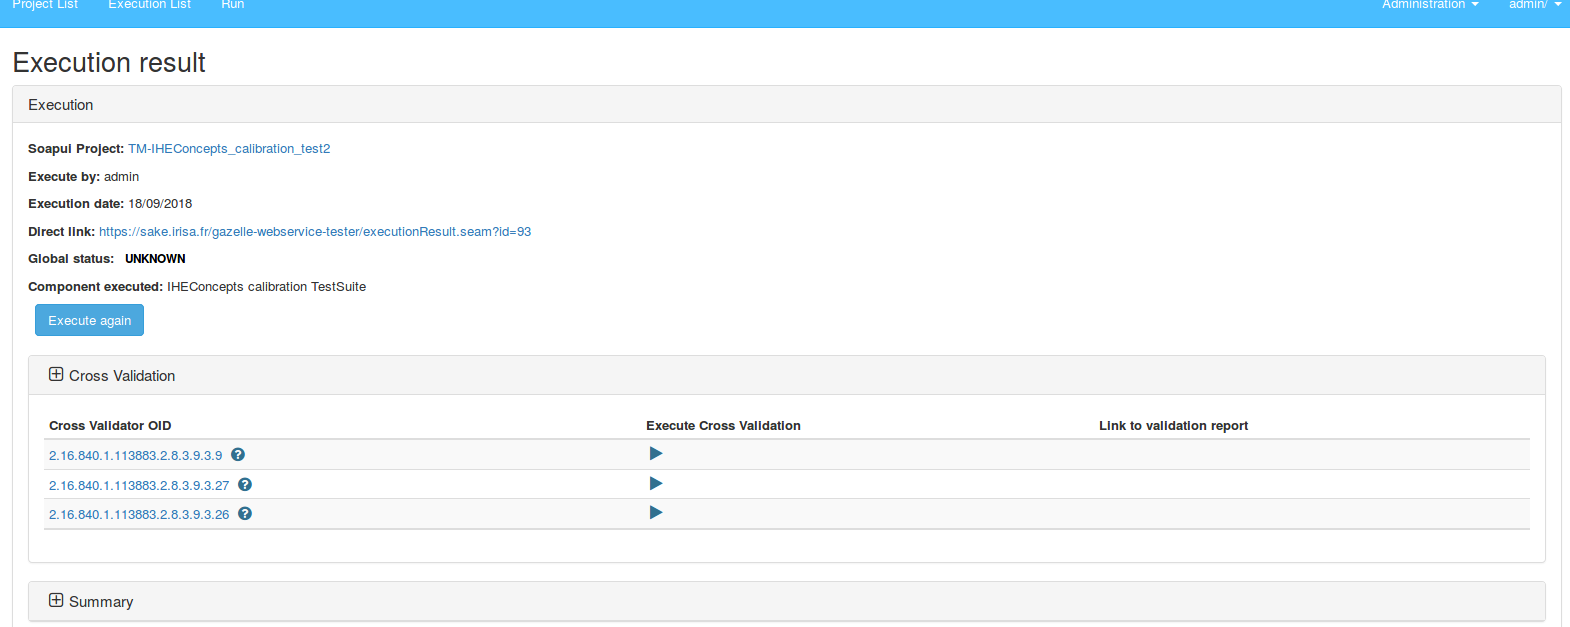
Click on a launch icon to call the OID’s corresponding cross validator.
You are redirected to the Cross Validation page in EVSClient.
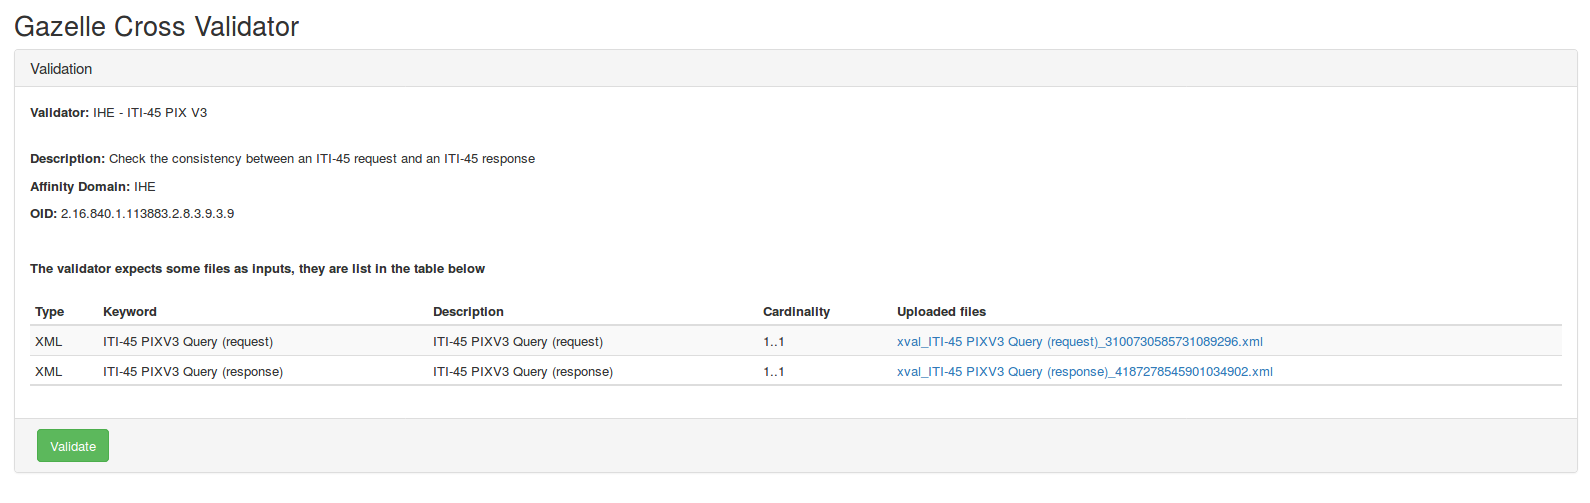
The OID of the cross validator is automatically referenced in this page. The inputs files must correspond to the test step’s content you identified in your property test steps.
**WARNING** : if not enough inputs are filled, you will not be able to perform a cross validation (no visible Validate button). Manually upload the remaining files or make sure you fill them all in your SoapUI project.
Click on Validate button.
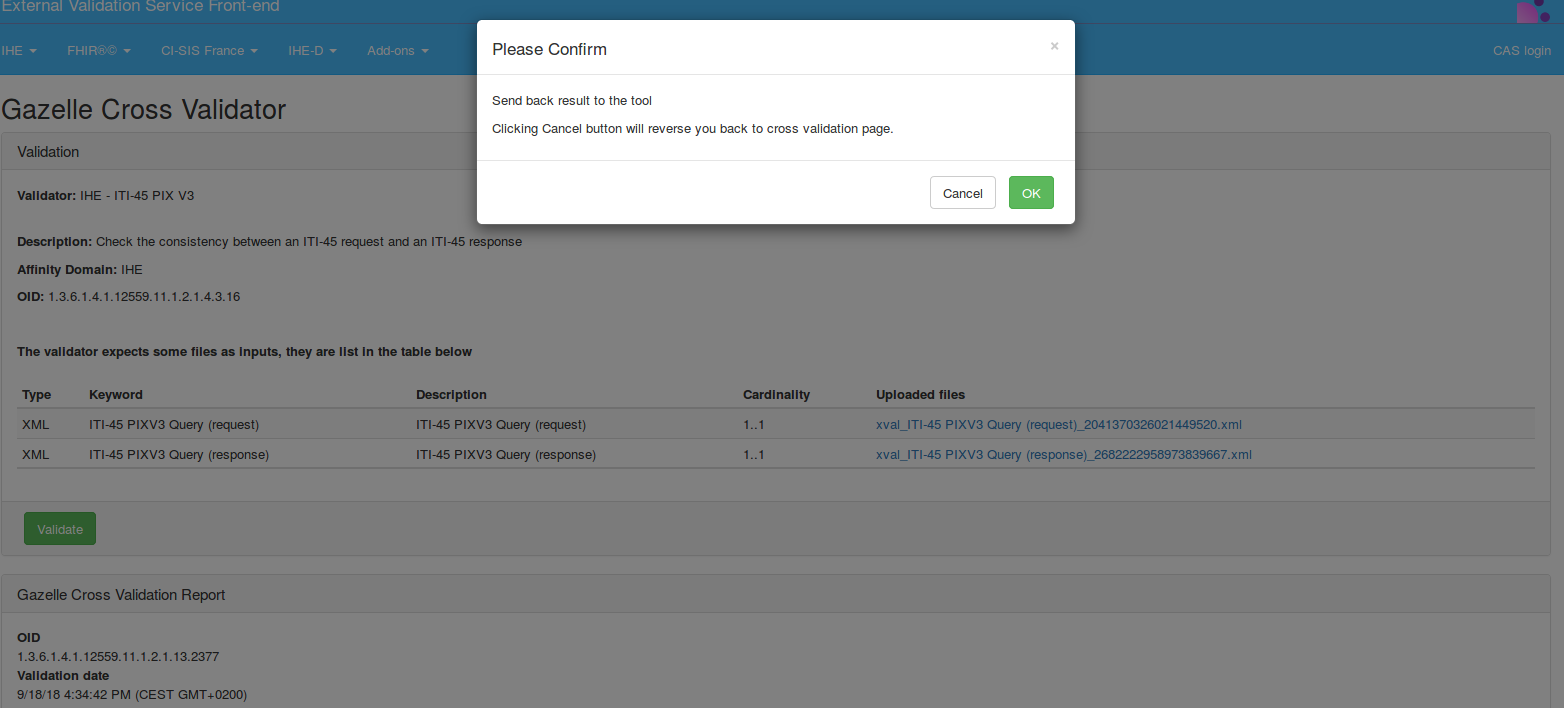
Click on OK button to go back to Gazelle Webservice Tester Execution page, with the cross validation performed.
Third step : display cross validation logs
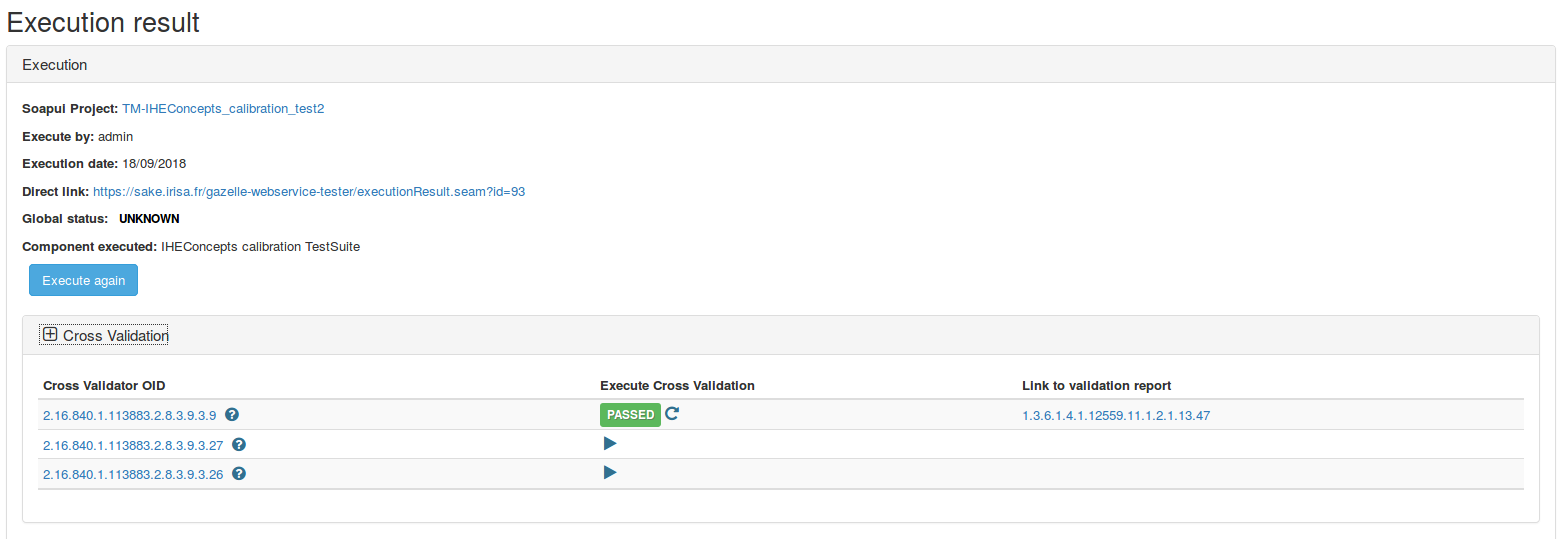
Once you have performed the cross validation, its status and permanent link (to access the report at any time) are displayed in the corresponding line of the table.
It is still possible to perform a cross validation again by clicking on the new refresh icon. It will replace the previous cross validation retrieved informations with this cross validator’s new ones.
Mock messages
In Mock Messages menu, exchanged messages with mocks are separated from other messages obtained when communicating with simulators in Gazelle Webservice Tester as part of transactions.
WARNING : This feature is only available to several mocks as specific configurations are required in their implementation. Please refer to mocks user manuals to know if they hold the configurations to use this feature.
Messages browser
Messages exchanged with mocks are gathered in a table with informations on their context of use (timestamp, transaction, initiator, responder, etc.). They can be filtered using those informations in the filter panel. For each transaction, actions such as validation with EVSClient and messages details are available.
Message details
Clicking on the magnifying glass in the Action column is redirecting to an overview on messages content. Validation using EVSClient is possible too by clicking on ‘Validate Again’ button. Informations on the validation are displayed once it has been performed and you have been redirected back to Gazelle Webservice Tester.